If you've ever taken a cross stitch piece that you've finished stitching to a professional framer, you know how $ costly $ it can be. The beautiful, large, full coverage patterns, or those that are sentimental to you, definitely deserve the investment of getting them professionally framed. However, as a cross stitch pattern designer, I have designed (and therefore stitched) many pieces that only took a few hours/days to complete. For these pieces, I don't really want to spend big bucks to have them framed so I am always looking for other ways to finish and display them.
Today I am going to show you one of my go-to finishing techniques - mounting my cross stitches projects on canvas covered with printed fabric. It's definitely my favourite way to finish seasonal pieces, and it will cost you less than $10 to complete (not including a couple of tools I am hoping you already own)!
What You Will Need
2. Canvas (either a painters canvas or a wood canvas)
3. A Glue Gun
4. Fabric Cutter
5. Exacto Knife
6. Pencil
7. Printed Fabric of your Choosing
8. Double-Sided Sticky Tape
9. Your Finished Cross Stitch Piece
Step 1 - Cover your Canvas with Printed Fabric
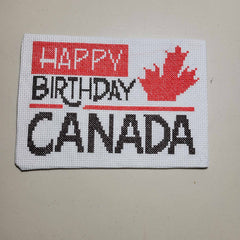
First, you'll want to go to your local fabric store and pick a fabric that will go well with your design. I happened to have this red fabric with white swirls which I think will go great with my "
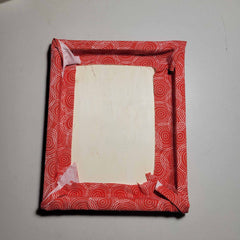
Oh Canada 3 of 3" cross stitch piece. If you don't have any printed fabrics, I would suggest going to your local fabric store. You should be able to pick up a 1/4 yard of fabric for less than $5. Next you will need a canvas. I just went to my nearby dollar store and picked up a wood painters canvas for $2.50. Here are both my wood canvas and printed fabric:
Next you will want to cut the printed fabric. You will need a 2-3" border on each side of the canvas. Here is a photo of my canvas with the printed fabric I have cut to size:
Now, one of the main reasons this is my favourite way to finish pieces, is that I can't sew to save my life. With this finishing technique there is no sewing, you use a glue gun. Take your glue gun and run glue all around the inside edges of the canvas and adhere your printed fabric to it. Make sure to keep the fabric is nice and taut so it fits nicely against the canvas. Here is an image of where to place the glue, and an image of the back of my canvas after I glued down the printed fabric:
The front of your canvas should now resemble something like this:
Step 2 - Cover your Cross Stitch Piece to Mounting Board
The second part to this finishing technique is to get your cross stitch piece on to some Mounting Board. I use
PRES-ON Mounting Board but I have also heard of stitchers pinning their piece to cardboard instead. Whatever you mount it on, just make sure it is acid-free so it doesn't discolour your stitched project over time. To start this step of the process, you'll need to cut your cross stitch fabric to a size that allows you to wrap it around the mounting board. Full disclosure, with this specific piece I cut the fabric WAY to close to my stitching. I left about 1" all around and I really should have left a minimum of 2". It made it much more difficult to get my stitched piece nice and taut on the mounting board. Here is my cross stitching after I cut it to fit the mounting board:
Here you can see the mounting board over my stitches with a 1" border of fabric (again, I should have left at least 2"):
Remove the paper on the mounting board to expose the sticky side and lay the sticky side directly onto the back of your stitches. Fold over the edges of your cross stitch fabric and use some double-sided tape to stick the edges down, as I have done here:
Your cross stitch piece should now be mounted to the mounting board, like so:
Step 3 - Adhere your Cross Stitch Piece to your Canvas
The last step to this finishing technique is the easiest (and most satisfying!). Remove the strips from the double-sided tape that you used to mount your cross stitching to the mounting board. I also add a little glue from my glue gun to the cardboard backing of the mounting board. Simply place it directly in the middle of your canvas with the printed fabric. And voila! You have an FFO (Fully Finished Object)!
I hope this gives you an idea of how to finish some of your smaller cross stitch pieces, or at least some inspiration. Until next time, happy stitching!


Leave a comment